One by one, all Clara’s bits and bobs have been freed of grime and polished to a shine. Much of it was tedious scrubbing and sanding, but now we’re ready to make some truly visible progress with a new paint job. This was the part I was most excited and nervous about; I’ve cleaned plenty of old machines before but never ventured into painting or decals before. Finding a source for the decals and learning to apply them was the only thing stopping me from doing this sort of restoration before now.
After plenty of careful taping, Dad and I primed her for a few coats of black enamel. The hours of sanding paid off as she took the satiny primer and then gleamed under the glossy black. Even covered with tape and missing most of her parts, the transformation was astounding. The shape of the Singer 66 is iconic, but one of the things I’ve always liked best about them was their beautiful gold designs. I’ve mentioned my love of Art Noveau before, and I ordered decals for her in one of the most ornate and colorful designs that was ever made for the 66 at the height of the Belle Epoque– the lotus, or thistle, pattern.

Painting was fun, but the decals were the part I was most nervous about. Cutting them from the sheet was nearly as bad as cutting threads for whitework embroidery, but after several hours they were all trimmed and laid out on the counter in an approximation of their placement. I’ve never actually gotten to see a 66 in this design, so I made sure to research the details of her design very carefully. Complicating the matter was the fact that no matter how closely I marked out pieces, I seemed to have a decal left over. After a couple frantic hours of peering at vintage machines, I came to the conclusion that we had extra decal.
The red eye pattern for the 66 has a small straight design on the flywheel cover, and a smaller, simper one above the tension screw. The lotus has a straight design on the flywheel cover too, but nothing above the tension screw – because the big decal on the arm of the machine has more visual weight at the ends, and probably would have looked too crowded. So in essence I had two decals that could be used for the flywheel cover; one larger and one smaller. This ended up being very lucky for me.

The first decal we applied was the smaller version of the flywheel one, just in case. It went on smoothly and shone against the black enamel. All my reading had me convinced that these decals would be as fragile as snowflakes and that correct positioning would be practically open-heart surgery, but they weren’t nearly as terrible as they had seemed. I couldn’t believe that I had never heard of decals before – they were great! I started eyeing other things around the house that could use a bit of fancying up. My phone, the computer, maybe the stand mixer . . . there were so many potential targets for a decal.
We let the flywheel cover dry, brought it downstairs for a clear coat, and disaster struck. Even a light clear coat beaded up on the plastic and rolled off in drips, wrinkling the edges. Nothing we tried could save it. The flywheel decal was a mess, and with a couple clear coats on it we couldn’t just peel it off and start again, either. I vaguely remembered a grownup putting decals on a vehicle as a kid, and I think a mishap screwed one up and seriously strained a friendship, too. Maybe this is why you rarely hear about them. Fortunately, my extra decal meant that I wouldn’t have to buy a whole new sheet. Sanding down the paint, testing scraps of decal paper, and making sure the clear coat would work was an unexpected hiccup (and the reason for the slow update). Dad discovered that only the tiniest dusting of clear coat could stick to the decals, so after a successful test of building up layers it was time to put the rest of the designs on Clara.

Dad showed me how to apply a decal with the flywheel cover, but putting on the rest of them would be up to me. With much double-checking against pictures of historical examples, I took it from the top. It was slow work – although there were only a few parts that were truly finicky, like the branched design under the vases. I cut the decal paper very close to them, and a couple times had a little branch fold over against itself and need to be very carefully detangled.
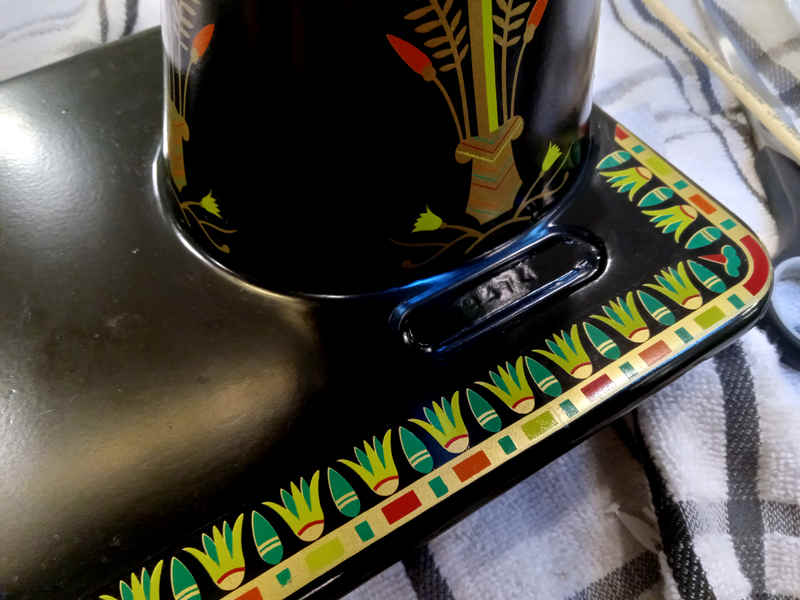
Except for the border and medallion on the bed of the machine, all the decals were applied to surfaces that were more or less curved. I had trimmed them close to start with, but in a few places a little extra trimming was necessary to accommodate the ease – especially for the large blossom over the stitch length screw and the one on the curve of the flywheel cover. After the careful easing and tiny branches lining up the edges of the six border pieces on the bed was simple in comparison. The scarab medallion in the middle was the perfect thing to finish on; it didn’t have too many projecting bits and sat nice and flat.

Overall there ended up being seventeen separate pieces to apply (I had to cut the spool medallion one in half to fit it around the post). In an afternoon Clara transformed from a black shape into a confection of the Gilded Age. Even missing her hardware and covered in tape, she is stunning. I’m itching to put her back together, but she’ll need several very thin top coats first, especially on the bed since it sees the most wear. As pretty as she is she’s not just for decoration – she’ll be set up in a treadle table and used beside Elizabeth in the studio.
