
There are a couple weeks until Christmas, and I know I’m not the only one finishing up a slew of homemade Christmas gifts. This how-to was originally going to be part of the Rainbow Stitch Sampler Tutorial (hence the pictures), but instead we decided to open it up to all for free – merry Christmas!
You certainly don’t need to ornament the front of this sturdy drawstring pouch with embroidery, but it is a great size for a small motif (2 ½” – 3 ½”, 6-9cm), and a good way to give embroidery to someone that may not have the wall space for a hoop. Whether you use it for sewing supplies, spare change, or something else entirely, they are handy to have around and make a great gift – especially when they’re full! If you'd prefer not to embroider, just choose a design fabric for the outside and a contrasting lining fabric for the inside. For this size bag quilting cotton, linen, muslin, or any other closely woven lightweight fabric will do fine.
Materials
One 13”x7” (33x18cm) rectangle of design fabric
One 13”x7” (33x18cm) rectangle of lining fabric
Sewing thread to match
18” (45cm) Ribbon, cord, or braid
Optional:
Rainbow Stitch Sampler Tutorial
Embroidery floss, hoop, needles (full list in tutorial)
Although the measurements we’ve given for this bag are 13”x7” (33x18cm) rectangles to make an approximately 5”x5 ½” (13x14cm) finished bag, it can be scaled up almost indefinitely if you’d like something larger than a change purse. You’ll have to figure out where to position your embroidery and how large to cut your fabric, but this pattern would work as well for a bread bag or even laundry bag as it does in this small size. It can be sized down slightly – our example was – but be mindful of the weight of your fabric. Heavy fabric is stiffer and requires more turning room than lighter fabric does, and could get bulky at small sizes. Likewise, thin quilting cotton wouldn’t stand up well to being a heavy-duty shoe bag for your barn boots; try to match your fabric to its intended purpose.

This little pouch certainly doesn't have to be embroidered, but if you’re using it to show off the Rainbow, you’ll need to mark the design and embroider the outer fabric before you stitch the bag. Fold your strip of fabric in half (the short way, so that you have a rectangle seven inches wide and 6 ½ inches – 18x16.5 cm tall with the fold at the bottom) and measure down three inches (7.5cm) from the top edge to place the top curve of the rainbow. Gently creasing the center of your fabric and pattern will help get the rainbow centered from side-to-side.


Iron both embroidered design fabric and lining fabric, and pin them together with the right sides facing each other. Sew together the long edges with a 1/2” (1.25cm) seam allowance either by hand with small running stitches or on a sewing machine.

Turn your fabric tube right-side-out; press. Fold over short edges towards lining 1/2” (1.25cm), press; fold them over again 1” (2.5cm), press again. Sew this folded casing 1/8” (3mm) from the edge on both sides. This will be the casing for the drawstring.
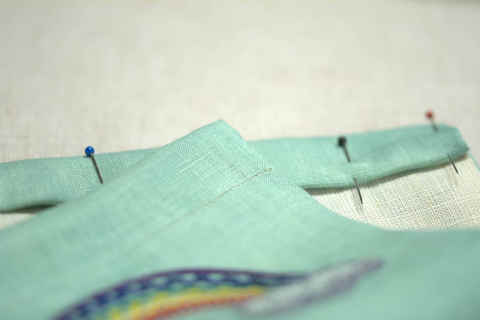
Fold your bag so that the embroidered fabric is on the inside. With a seam allowance of 1/4”(6mm), sew the long sides from the fold up the bag, stopping just before your sewn casing lines, on both sides.

Flip your bag right-side-out; press one last time. Pass the cord or ribbon through both of the drawstring casings using a yarn needle, bodkin, or safety pin, and knot it at one or both sides as you wish. Your bag is complete and ready to be used!

