
My vision for the Moon Rabbit was very dimensional, and in order to give it height and shape, it would need layers and layers of padding. Usually they are worked from the smallest to the largest, but with a shape as complex as this I built up layers like a topographic map. I shaded a picture of the Rabbit to get an idea of the relative height of each part, and then used that to map and cut out layers of felt until I had a fair approximation of half a bunny. Stitching them down was a fairly slow process, as each layer had to be adjusted and trimmed. Tracing any more than the circle of the design would be useless; all the padding would just cover it up.
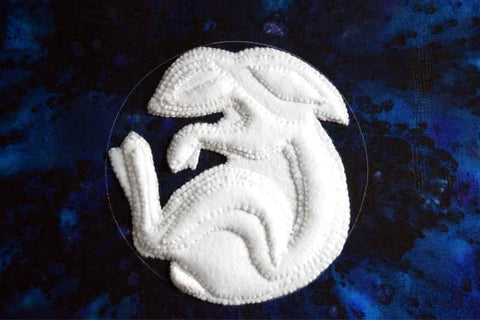
These layers of felt gave me a good basic shape, but the edges were rough and stepped – and that would show in the final piece unless it was smoothed over. One more layer of felt would cover things over quite nicely – although here I ran into more trouble. Due to the high padding and complex shape, there was no way to know just how much or where to apply ease to the final piece. If any part of it wasn’t enough to cover the base, it would leave a noticeable line. If it overhung, it would make the background lumpy. It would have to be cut as I stitched it down, which meant that I would be effectively stitching blind.
I could feel the shape of the rabbit under the felt, and slowly, with much unpicking and careful trimming, covered it with the final piece. This smoothed out the ridges of the padding – the topographic map had become geography. Felt is a little stretchy and doesn’t have a grain, which made the process easier. There were no edges to turn under and no real fraying. A few areas required a stitched line to define them like the hip, the ear, and the distinction between the near and off feet. I also put in some stitches to mark out where the eye would sit, and define it from the cheekbone.

Although this part of the process was difficult, it made an enormous difference and with a few added details could stand on its own as a finished piece. However, this Moon Rabbit is destined for more sparkle. The next step (and the first to be actually visible on the finished piece) was to appliqué kid leather in certain areas. This was done nearly the same as the felt, on a smaller scale. Each piece was measured, trimmed, and attached with tiny stitches around the edge. Those stitches will be covered later – but they are much more secure than glue, and safer for the piece in the long run, too.
It’s possible to get kid leather in a number of shades now, but the most common seems to be a soft silvery-golden color, which is what I have. Next to gold it can look almost silver. What should have occurred to me, however, was the opposite – that next to silver it would look much more gold. It was more of a contrast than I was planning on, but that was alright. I had already changed my sketch to include some soft blues in the background and add white beads with a hint of iridescent pink, so the gold should look more at home.

The background of the moon was something I had given much thought to; it had to be smooth, flat, and with just a little depth of color to draw the eye in to the center. Or Nué was the perfect technique to try out. Or nué is a medieval technique much used in ecclesiastic embroidery; it can produce truly incredible variations of light and shade. In a sense it’s almost like tapestry; threads of different colors are worked over a ground to produce a pattern. However, the ground in or nué is a smooth metal thread, and the colored stitches anchor it to the fabric. Using different colors and varying the amount of metal that shows between them makes a surface that seems to be simultaneously delicately colored and gleaming. Unlike some of the great medieval artists, I wouldn’t be using it to depict folds of fabric or saints – just to add a touch of blue to darken the background.

In order to get an absolutely smooth background, I could not work each section with one pair of threads back and forth as is usually done - each line would have to be a separate pair of threads. This meant hundreds of ends to sink down at the edges of the felt. This took nearly as long as sewing them down, and looked a bit strange until they were all tidily secured on the back. Some of these threads were very short (held in place by just two or three stitches on the front) and pulling just enough of the ends through to the back without pulling out the entire piece was a slow and frustrating process.

It was tempting to let the Moon Rabbit be finished at this point, but the visible tacking stitches would drive me crazy. So I put it aside for a few days, waiting for some additional supplies to come in. I found silver material that would hopefully fill in the space between the beads as well as a few iridescent surprises that I hoped would add some variety and a little more color.
Having the background complete really made all the difference; the Rabbit made much more visual ‘sense’ against the circle of silver. The only structural work that remained was a little string padding to build up the edges of the ears. For a set of techniques that were mostly new to me things were working out rather well.
